
Table Of Contents
- Tutorial: Application development with MapFish Framework 1.2
Previous topic
Next topic
8 hours introduction to MapFish Framework 1.2
8 hours introduction to MapFish Framework 1.2
Warning
This document includes outdated information.
One goal of this tutorial is to provide a step-by-step process for the creation of a MapFish application. This requires an undertstanding of JavaScript and Python development.
Another goal is to present the usage of Pylons templates for the development of MapFish applications.
This training is made for the Python version of MapFish server.
This HOWTO is done for computer with an Debian/Ubuntu distribution.
Two files are provided:
- A GeoTiff raster file, containing a satelite picture of the earth. Coordinate system: EPSG:4326. bluemarble.tiff.
- A shapefile containing country boundaries and some statistical information. Coordinate system: EPSG:4326. countries.zip.
Install first the MapFish Framework Installation.
In order to load the countries file (countries.zip) in a PostGres 8.3 and PostGIS 1.3 database, the following procedure can be follow:
Create a new database “howto” (sometimes, it can be useful to restart the database ” sudo /etc/init.d/postgresql-8.3 restart”). This procedure first create a PostGres database and then add the PostGIS support, in order to manage geometries:
sudo su postgres
createdb -E UNICODE howto
createlang plpgsql howto
psql -d howto -f /usr/share/postgresql-8.3-postgis/lwpostgis.sql
psql -d howto -f /usr/share/postgresql-8.3-postgis/spatial_ref_sys.sql
psql -d howto -c "SELECT postgis_full_version()"
exit
The last query will inform you about the version of the installed PostGIS version.
Import the data in the “howto” database:
unzip countries.zip
sudo su postgres
shp2pgsql -W utf8 -s 4326 countries.shp  countries | psql -d howto
exit
Create a www-data user, if it doesn’t exist (answer “no” to every question):
sudo su postgres
createuser -U postgres -P "www-data"
exit
And to check that everything is ok. Additionaly we need to grant the access to this table to user www-data in order to allow an access from MapFish server in a web environment:
sudo su postgres
psql howto
\d
select count(1) from countries;
GRANT ALL ON countries TO "www-data" ;
GRANT SELECT ON geometry_columns TO "www-data";
GRANT SELECT ON spatial_ref_sys TO "www-data";
\q
exit
If MapServer is installed, you should be able to access it through http://localhost/cgi-bin/mapserv
In some cases, it is needed to create a symbolic link:
cd /var/www/localhost/cgi-bin/
ln -s /usr/lib/cgi-bin/mapserv .
In directory mapfish_framework, you can create a directory mapserver for storing the mapfile and the data ((countries.zip (don’t forget to unzip it) and bluemarble.tiff):
cd mapfish_framework
mkdir mapserver
cd mapserver
In this directory, create a mapfile. This mapfile contains two layers: bluemarble and countries. Adapt the path to the correct location in your environment, IMAGEPATH for example:
MAP
 NAME "howto"
 EXTENT -180 -90 180 90
 IMAGECOLOR 255 255 255
 IMAGETYPE png
 SIZE 400 300
 STATUS ON
 UNITS METERS
 MAXSIZE 4000
 PROJECTION
  "init=epsg:4326"
 END

 WEB
   IMAGEPATH "/home/cmoullet/mapfish_framework/mapserver/"
   IMAGEURL "/mapfish_framework/"
   METADATA
     "wms_title"           "WMS HowTo"
     "wms_onlineresource"  "http://localhost/cgi-bin/mapserv?map=/home/cmoullet/mapfish_framework/mapserver/mapfile.map&"
     "wms_srs"             "EPSG:4326"
   END
 END

 LAYER
   DATA "/home/cmoullet/mapfish_framework/mapserver/bluemarble.tiff"
   NAME "bluemarble"
   PROJECTION
     "init=epsg:4326"
   END
   METADATA
     "wms_title"           "bluemarble"
     "wms_srs"             "EPSG:4326"
   END
   STATUS ON
   TYPE RASTER
   UNITS METERS
 END

 LAYER
   CONNECTION "host=localhost dbname=howto user=www-data password=www-data"
   CONNECTIONTYPE POSTGIS
   DATA "the_geom from countries using unique gid"
   NAME "countries"
   PROJECTION
     "init=epsg:4326"
   END
   METADATA
     "wms_title"           "countries"
     "wms_srs"             "EPSG:4326"
   END
   STATUS ON
   TYPE POLYGON
   UNITS METERS
   CLASS
     NAME "country"
     STYLE
       ANGLE 360
       COLOR 252 199 101
       OPACITY 80
       SYMBOL 0
     END
     STYLE
       ANGLE 360
       OPACITY 100
       OUTLINECOLOR 118 73 1
       SYMBOL 0
     END
   END
 END

END
To test that everything is ok, you can checkt with the GetCapabilities function (you have to replace the path to you mapfile in you environment (map parameter)):
Then, two GetMap can be tested to validate the mapfile:
Several installation ways are possible for Tilecache. Have a look at TileCache documentation.
We will use the Apache mod_python way
sudo apt-get install tilecache
It is then needed to configure Apache, for example by creating a conf file /var/www/localhost/conf/tilecache.conf (or modifiy the file /etc/apache2/apache2.conf after sudo apt-get install libapache2-mod-python):
<Location /tilecache>
   SetHandler python-program
   PythonHandler TileCache.Service
   PythonOption TileCacheConfig /etc/tilecache.cfg
</Location>
You can check the Apache conf syntax:
sudo apache2ctl -t
and restart Apache gracefully, if it’s ok:
sudo apache2ctl graceful
Then, edit the TileCache configuration (TileCache configuration documentation) file under /etc/tilecache.cfg, for example with:
[bluemarble]
layers=bluemarble
type=WMSLayer
url=http://localhost/cgi-bin/mapserv?map=/home/cmoullet/mapfish_framework/mapserver/mapfile.map
bbox=-180,-90,180,90
srs=EPSG:4326
extension=png
maxResolution=1.40625
levels=16
Or for a swiss layer:
[wne_unesco]
layers=wne_unesco
type=WMSLayer
url=http://www.ecogis.admin.ch/de/wms
bbox=420000,30000,900000,350000
srs=EPSG:21781
extension=png
resolutions=650,500,250,100,50,20,10,5,2.5
Everytime you edit the tilecache config file, don’t forget the:
sudo apache2ctl graceful
And, most important, you can generate the tile. In this case, we will use the bluemarble layer configured in tilecache.cfg. The just create WMS server is used. We need to define the user www-data in order to let Apache serve the tiles “to the world”.
sudo rm -fr /tmp/tilecache/
cd /etc/
sudo -u www-data /usr/sbin/tilecache_seed bluemarble 0 3
If everything is going fine, you can have a look at a tile here:
http://localhost/tilecache/1.0.0/bluemarble/0/0/0.png
Note
It is possible to know the available layers in a WMS server with a GetCapabilities query: http://labs.metacarta.com/wms/vmap0?REQUEST=GetCapabilities&SERVICE=WMS or http://www.ecogis.admin.ch/fr/wms?REQUEST=GetCapabilities&SERVICE=WMS
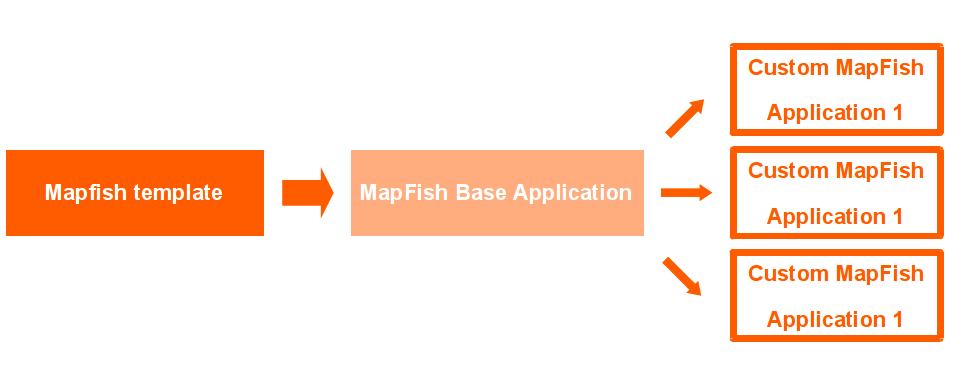
MapFish provides two Pylons template, named “mapfish” and “mapfish_client” which defines the general organization of a MapFish project.
This tutorial will present the creation of a custom application in two steps.
- Step 1: create a base MapFish application which contain common elements to several applications. This can be seen as a MapFish Application Template.
- Step 2: instantiate a base MapFish application for creating a custom application.
The term templates can have several meaning, that is why we will use the the term “MapFish Base Application” for what can be seen as a template of MapFish application. This MapFish Base Application can be instantiated to create a custom MapFish application. Then, it is possible to modify this instance and define custom behaviors.
Note
The “MapFish Base Application” is a MapFish application, so if you don’t need to create a template of MapFish application, you can directly write your code in this application.
If you want to provide an API (see MapFish API), you need to take this aspect in account for the architecture of the application. We will present in this tutorial the way to create an API for the created applications.
Be sure that the virtual environment installed during the installation procedure is activated, then you can type:
mkdir mapfish_framework
source venv/bin/activate
Create a base MapFish Application from the general mapfish template:
paster create --overwrite --no-interactive -t mapfish MapFishAppBase  sqlalchemy=true
paster create --overwrite --no-interactive -t mapfish_client MapFishAppBase
Then, you need to make sure that the application can access the database:
cd MapFishAppBase
And edit development.ini by setting:
sqlalchemy.url = postgres://www-data:www-data@localhost/howto
You can test it by starting the server:
paster serve --reload development.ini
Edit development.ini again, comment the [composite:main] section entirely:
#[composite:main]
#use = egg:Paste#urlmap
#/ = pylons_app
#/mfbase = mfbase
#/examples = examples
and change [app:pylons_app] to [app:main]
After restarting the server:
paster serve --reload development.ini
... you should be able to access to the MapFish javascript library at this URL:
http://localhost:5000/mfbase/mapfish/MapFish.js
And you can test it with:`
http://localhost:5000/countries?limit=1&attrs=continent,pays&no_geom=true
Let’s start developing the Base MapFish Application:
cd MapFishAppBase
mkdir -p mapfishappbase/public/app/base/js
In this directory, we will store several files. The first one will initilized the application. MAPFISHAPP_init.js:
/*
* @include MAPFISHAPP_map.js
* @include MAPFISHAPP_layout.js
*/

Ext.namespace("MAPFISHAPP");

(function() {
   // run MAPFISHAPP.layout.init() when the page
   // is ready
   Ext.onReady(function() {
       var layerStore = MAPFISHAPP.map.create();
       MAPFISHAPP.layout.init(layerStore);
   });
})();
Create the layout of the application with EXT. MAPFISHAPP_layout.js:
/*
* @include MAPFISHAPP_mappanel.js
*/

Ext.namespace("MAPFISHAPP");

MAPFISHAPP.layout = (function() {
   /*
    * Private
    */

   /*
    * Public
    */
   return {

       /**
        * APIMethod: init
        * Initialize the page layout.
        *
        * Parameters:
        * layerStore - {GeoExt.data.LayerStore} The application's global layer
        *  store, includes a reference to the map instance.
        */
       init: function(layerStore) {
           new Ext.Viewport({
               layout: "border",
               items: [{
                   region: "west",
                   title: "west",
                   width: 200
               }, Ext.apply({
                   region: "center",
                   title: "map"
               }, MAPFISHAPP.mappanel.create(layerStore))
               ]
           });
       }
   };
})();
Define the map. MAPFISHAPP_map.js Don’t forget to modifiy the MAPFILE path, according to your environment:
/*
* @include OpenLayers/Map.js
* @include OpenLayers/Layer/WMS.js
* @include OpenLayers/Control/Navigation.js
*/

Ext.namespace("MAPFISHAPP");

MAPFISHAPP.map = (function() {

   /*
    * Private
    */

   /**
    * Constant: MAPFILE
    * Filesystem path to mapfile.
    */
   var MAPFILE = "/home/elemoine/work/formation_cantons/mapserver/mapfile.map";

   /**
    * Method: getDerivedMapNS
    * Returns the namespace of the derived application's map module, returns
    * undefined if there's no derived application or if the derived
    * application has no map module.
    */
   var getDerivedMapNS = function() {
       var retVal;
       var ns = window.MAPFISHAPPDERIVED;
       if(ns && ns.map) {
           retVal = ns.map;
       }
       return retVal;
   };

   /**
    * Method: createBaseLayers
    * Return the application's base layers.
    *
    * Returns:
    * {Array({OpenLayers.Layer})} Array of base layers.
    */
   var createBaseLayers = function() {
       return [
           new OpenLayers.Layer.WMS(
               "bluemarble",
               "http://localhost/cgi-bin/mapserv?",
               {
                   map: MAPFILE,
                   layers: "bluemarble"
               }
           )
      ];
   };

   /**
    * Method: createLayers
    * Return the application's layers.
    *
    * Returns:
    * {Array({OpenLayers.Layer})} Array of layers.
    */
   var createLayers = function() {
       var layers = createBaseLayers();
       var derivedMap = getDerivedMapNS();
       if(derivedMap) {
           layers = layers.concat(
               derivedMap.createLayers()
           );
       }
       return layers;
   };

   /**
    * Method: createMap
    * Return the application's map instance.
    *
    * Parameters:
    * div - {String} The id of the div the created map must
    * be placed into, if undefined a non-rendered map is
    * returned.
    *
    * Returns:
    * {OpenLayers.Map} The map instance.
    */
   var createMap = function(div) {
       var map = new OpenLayers.Map({
           div: div,
           controls: [
               new OpenLayers.Control.Navigation()
           ]
       });

       // a map searcher is added to the map
       var searcher = new mapfish.Searcher.Map({
           map: map,
           protocol: mapfish.Protocol.MapFish.create({
               url: "countries",
               params: {
                   no_geom: true,
                   attrs: ["continent", "pays"],
                   limit: 10
               }
           }),
           searchTolerance: null,
           displayDefaultPopup: true
       });
       map.addControl(searcher);
       searcher.activate();

       return map;
   };

   /**
    * Method: createLayerStore
    * Return the application's global layer store.
    *
    * Returns:
    * {GeoExt.data.LayerStore} The global layer store.
    */
   var createLayerStore = function() {
       return new GeoExt.data.LayerStore({
           map: createMap(),
           layers: createLayers()
       });
   };

   /*
    * Public
    */

   return {

       /**
        * APIMethod: create
        * Create the application's global layer store.
        *
        * Returns:
        * {GeoExt.data.LayerStore} The application's global layer store.
        */
       create: function() {
           return createLayerStore();
       },

       /**
        * APIMethod: _createMap
        * Method used from within the API module to create a map.
        *
        * Parameters:
        * div - {String} The id of the div the created map must
        * be placed into, if undefined a non-rendered map is
        * returned.
        *
        * Returns:
        * {OpenLayers.Map} The map instance.
        */
       _createMap: function(div) {
           return createMap(div);
       },

       /**
        * APIMethod: _createLayers
        * Method used from within the API module to create the layers.
        *
        * Returns:
        * {Array({OpenLayers.Layer})} Array of layers.
        */
       _createLayers: function() {
           return createLayers();
       }
   };
})();
And the map panel. MAPFISHAPP_mappanel.js:
/*
* @include GeoExt/widgets/MapPanel.js
*/

Ext.namespace("MAPFISHAPP");

MAPFISHAPP.mappanel = (function() {
   /*
    * Private
    */

   /*
    * Public
    */
   return {

       /**
        * APIMethod: create
        * Return the map panel config.
        *
        * Parameters:
        * layerStore - {GeoExt.data.LayerStore} The application layer store.
        */
       create: function(layerStore) {
           var map = layerStore.map;
           return {
               xtype: "gx_mappanel",
               id: "mappanel",
               map: map,
               layers: layerStore
               //tbar: new Ext.Toolbar(MAPFISHAPP.controltoolbar.create(map))
           };
       }
   };
})();
There is also some code for the API, which will allow the creation of a map. MAPFISHAPP_api.js
/*
* @include MAPFISHAPP_map.js
*/

Ext.namespace("MAPFISHAPP");

/**
* APIMethod: constructor
* The API constructor.
*/
MAPFISHAPP.api = function() {
};

MAPFISHAPP.api.prototype = {
   /**
    * APIMethod: createMap
    * Create a map and include it in a given div.
    *
    * Parameters:
    * config - {Object} Config object, include a property
    * named "div" whose value is the id of the div into
    * which the map is to be rendered.
    */
   createMap: function(config) {
       // create map
       var map = MAPFISHAPP.map._createMap(config.div);

       // add layers
       layers = MAPFISHAPP.map._createLayers();
       map.addLayers(layers);

       // zoom to the maximum extent
       map.zoomToMaxExtent();
   }
};
We are almost done. Let’s store an index.html file in the public directory
<html>
<head>
   <link rel="stylesheet" type="text/css" href="mfbase/ext/resources/css/ext-all.css" />
   <link rel="stylesheet" type="text/css" href="mfbase/ext/resources/css/xtheme-gray.css" />
   <link rel="stylesheet" type="text/css" href="mfbase/mapfish/mapfish.css" />

   <script type="text/javascript" src="mfbase/ext/adapter/ext/ext-base.js"></script>

   <script type="text/javascript" src="mfbase/ext/ext-all-debug.js"></script>
   <script type="text/javascript" src="mfbase/openlayers/lib/Firebug/firebug.js"></script>
   <script type="text/javascript" src="mfbase/openlayers/lib/OpenLayers.js"></script>
   <script type="text/javascript" src="mfbase/openlayers/lib/OpenLayers/Lang/fr.js"></script>
   <script type="text/javascript" src="mfbase/geoext/lib/GeoExt.js"></script>
   <script type="text/javascript" src="mfbase/mapfish/MapFish.js"></script>

   <script type="text/javascript" src="app/base/js/MAPFISHAPP_mappanel.js"></script>
   <script type="text/javascript" src="app/base/js/MAPFISHAPP_layout.js"></script>
   <script type="text/javascript" src="app/base/js/MAPFISHAPP_map.js"></script>
   <script type="text/javascript" src="app/base/js/MAPFISHAPP_init.js"></script>

   <!--
   <script type="text/javascript" src="app/derived/js/MAPFISHAPPDERIVED_map.js"></script>
   -->

</head>
<body>
</body>
</html>
You can test it by starting the server:
source venv/bin/activate
paster serve --reload development.ini
Don’t forget to click on the map to see the tooltip ;-)
And now, “cerise sur le gâteau”, this is possible to create an HTML page that will use the base application. example_use_api.html
<html>
<head>
   <link rel="stylesheet" type="text/css" href="mfbase/ext/resources/css/ext-all.css" />
   <link rel="stylesheet" type="text/css" href="mfbase/ext/resources/css/xtheme-gray.css" />
   <link rel="stylesheet" type="text/css" href="mfbase/mapfish/mapfish.css" />

   <script type="text/javascript" src="mfbase/ext/adapter/ext/ext-base.js"></script>

   <script type="text/javascript" src="mfbase/ext/ext-all-debug.js"></script>
   <script type="text/javascript" src="mfbase/openlayers/lib/Firebug/firebug.js"></script>
   <script type="text/javascript" src="mfbase/openlayers/lib/OpenLayers.js"></script>
   <script type="text/javascript" src="mfbase/openlayers/lib/OpenLayers/Lang/fr.js"></script>
   <script type="text/javascript" src="mfbase/geoext/lib/GeoExt.js"></script>
   <script type="text/javascript" src="mfbase/mapfish/MapFish.js"></script>

   <script type="text/javascript" src="app/base/js/MAPFISHAPP_map.js"></script>
   <script type="text/javascript" src="app/base/js/MAPFISHAPP_api.js"></script>

   <!--
   <script type="text/javascript" src="app/derived/js/MAPFISHAPPDERIVED_map.js"></script>
   -->

   <script type="text/javascript">
       function init() {
           var api = new MAPFISHAPP.api();
           api.createMap({div: "map"});
       }
   </script>

</head>
<body onload="init()">
   <p>API Usage example</p>
   <div id="map" style="width:600px;height:400px;border:solid thin"></div>
</body>
</html>
If you place it in public directory, you can test it here:
In order to create a MapFish Application Template, a small bash script can be used: templatize.sh
Copy this script in directory MapFishAppBase
Then start it:
cd mapfish_framework
bash ./MapFishAppBase/templatize.sh MapFishAppBaseTmpl mapfishappbasetmpl
This will create a template MapFishAppBaseTmpl
The installation (in order to use it) of the MapFish Application Template is done this way:
cd MapFishAppBaseTmpl
python setup.py develop
You can check that ths template is available by starting the following command. You will find the new “mapfishappbase” in the list:
paster create --list-templates
And from the template, it is possible to create a mapFish application:
cd mapfish_framework
paster create -t mapfishappbase MapFishAppDerived1
And then, you can test your new application:
cd MapFishAppDerived1
paster serve --reload development.ini
You can add custom code in MapFishAppDerived1/mapfishappderived1/public/app/derived/js. for example some code that will add layers in the custom application (MAPFISHAPPDERIVED_map.js). Don’t forget to modify MAPFILE according to your environment.
Ext.namespace("MAPFISHAPPDERIVED");

MAPFISHAPPDERIVED.map = (function() {

   /**
    * Constant: MAPFILE
    * Filesystem path to mapfile.
    */
   var MAPFILE = "/home/cmoullet/mapfish_framework/mapserver/mapfile.map";

   return {
       /**
        * Method: createLayers
        * Return the derived application's layers.
        *
        * Returns:
        * {Array({OpenLayers.Layer})} Array of layers.
        */
       createLayers: function() {
           return [
               new OpenLayers.Layer.WMS(
                   "countries",
                   "http://localhost/cgi-bin/mapserv?",
                   {
                       map: MAPFILE,
                       layers: "countries",
                       transparent: true
                   },
                           {
                       singleTile: true
                   }
               )
           ];
       }
   };
})();
In the index.html, you need to add this new javascript (uncomment the app/derived/js/MAPFISHAPPDERIVED_map.js part)
And then, you can test your custom application:
cd MapFishAppDerived1
paster serve --reload development.ini
Great, isn’t it ?